Train like a videogame character

I’ve always been a huge fan of video games. The more I’ve played, the more I’ve enjoyed myself. Fighting games and RPGs once had total control over my life, I even remember once there was an epic battle between a complete stranger and me on MARVEL SUPER HEROES VS CAPCOM that ended in a complete draw. I still love video games. In our fitness pursuit, video games have something to teach us. If you want to be like Link, Scorpion or the Dovakiin, you should train like a videogame character.

Lessons Learned

The mission

In video games, our characters have a mission, a huge mission that define their whole lives, or at least, their whole goal in the game (in Mortal Kombat I you prove you’re the toughest fighter, in MKII you save the world, in most RPGs you both save the world and or the universe). To reach this goal, they have to take on smaller quests and milestones: you beat other combatants, monsters, etc. So what’s the lesson here?

You should have a main, big goal: save the world, be the best.

To achieve it, you should focus on different milestones: deadlift x2 your bodyweight, have a 30 seconds free handstand.

You catch my drift.

Leveling up

Every game has the same pattern: they get more difficult as you advance, so, in kind, you must get better in order to win.

Train like a videogame character and defeat the big bad boss

Thank god you brought your swords. Final Fantasy X belongs to Square Enix

Your opponents are faster, stronger and more resilient.

This translates exactly to your training, whether it is bodyweight (going after more complex and harder exercises) or with weights (going heavier, longer, with lower rest periods). Bottom line is: you’ve got to have a challenge yourself if you want to progress.
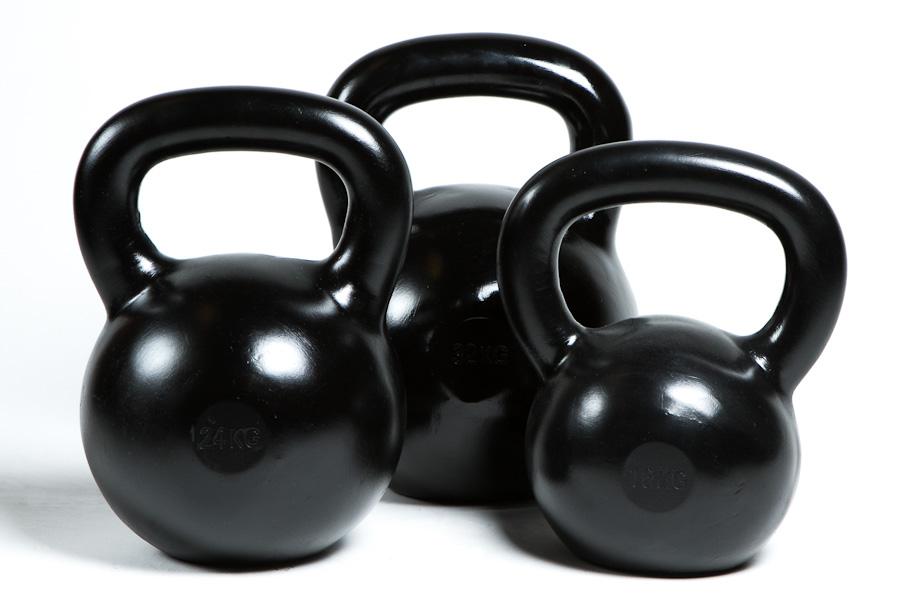
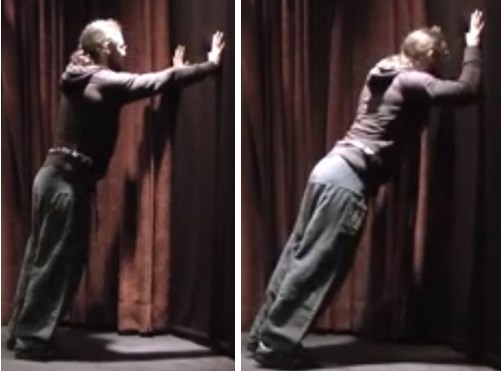
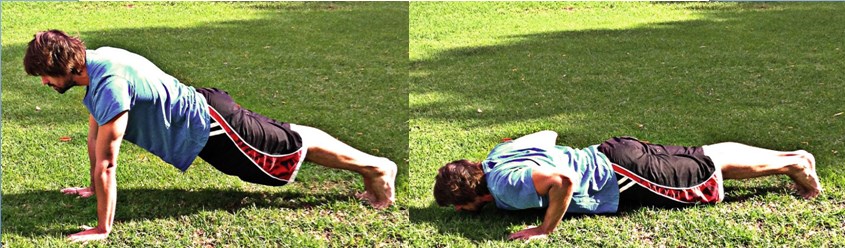
Choose your weapons

This is the most beautiful part. Your game character has a low amount of movements.

In Street Fighter you have 3 kicks and 3 punches (that only vary in intensity) and one or two special moves. In RPGs, you’re usually running or fighting, and for fights, you usually have between one and three moves, done over and over again until eventually you level up, when you do you either get stronger or you learn a new skill (in more complex games you’ll have to master some moves to learn specific ones).

Bottom line: restrict the amount of exercises you perform if you want to make real gains. Usually, one per movement pattern should get you in the clear (this post should take you in the right direction, but it’s the bare minimum). Use your common sense, choose those that’ll help you achieve your main goal (see title number one up here).

What to take from all this

When you’re creating your character, you should take all of these aspects into account. Or better yet, fill this list:

  1. What’s your main quest: list your longer term goals:
  2. Give us 3 milestones or shorter term goals that you’ll need to achieve before you save the world (ie: beat Goro/compete in a 1 mile race)
  3. How many moves will your character perform, and how often? You may want to choose weak, medium and strong movements of the same pattern (like Street Fighter).

Now go forth hero, and save the world (or kick Shang Tsung’s ass).

high level

Motus Virtute

If you’ve liked this post and want to keep reading our awesomish material, subscribe to our blog!

A push + A pull + a leg: a Simple Strength training routine

We’ve all seen a million programs. Right now, if you open a fitness magazine you’ll see the lastest GET YOUR ABS RIPPED IN 10 MINUTES

not the results of a strength training routine

Not gonna happen without some genetical, chemical and even magical help

PROGRAM program in which you’ll be even belly dancing in order to get your abs to show. Of course, most of these programs are overkill. That’s one of the many reasons they won’t help you succeed. Now, the list of problems with those types of strength training routine is long, hauntingly so, and it’s a topic for another post. Today I’m going to share with you my go to routine for time compressed moments. This, of course, is not the best program ever, but it will get you results with minimal, but very constant, efforts. This is a generalist’s program. It won’t give you buldging biceps, monstrous calves and laundromat abs, but it will make you stronger and fitter (it is after all a strength training routine).

So, to the program!

I’m going to give you options for kettlebells, bodyweight and barbells. I will not, though, give you machine variants, nor sandbags (since I’m absolutely not an expert).

A push

Barbell/Dumbbell: Benchpress, pushpress, military press, side press.

Kettlebells: Military Press (give it a clean as well), push press, sots press, sidepress.

Bodyweight: push-ups (variants), handstand push-ups, dips.

A pull

Barbell/dumbbell: Row, deadlifts. Weighted pull-ups

Kettlebell: Row, snatch, swings

Bodyweight: Pull-ups (if you can’t manage one yet click here, more advanced variations to come), Bodyweight rows.

A leg

Barbell/dumbbell: Font/Back/Goblet squat, deadlifts

Kettlebell: front/goblet/over the head squat, swings, snatch, Clean & Jerk

Bodyweight: squats, pistols, jumpsquats.(Variants and how to get to your first pistol here)

How to make it work

This is a minimalist program. Pick one exercise from each. You’ll be doing this 5 days a week (yes, 5). You’ll be doing 2-3 sets of each every day.

Deadlifts are key to every strength training routine

Completely complete, there’s a reason dead’s are a staple in every strength training routine. Photo by Tom Woodward

You’ll keep your reps low (swings, snatches and bodyweight squats may be done in higher reps, but I don’t recommend it), and you will never ever go to failure. Keep your rests longish.

How to progress:

Barbells: this one’s easier. You’ll be adding 2.5kg (5 pounds) to each exercise every 3 workouts.

Kettlebells: you’ll be adding 1 rep a week, but never on Mondays.

Bodyweight: you’ll be adding 1 rep a week, but never on Mondays either.

On kettlebells and bodyweight excercises once you get to 10 reps (which is what I call highish reps) you’ll change to a tougher variant. The reason I ask you not to add to the challenge on Mondays is because you’ll be better rested, but not necessarily stronger. Every one of these workouts should build to the next.

As you can see, it’s a pretty straight forward strength training routine. You pick a few exercises, and go, slowly progressing as you get stronger. You can’t go wrong!

Motus Virtute

Burn baby Burn

Summer is a beautiful season. Light of clothes and with longer days, many grow self conscious about their looks (ridiculous, I know, since most of

how to lose weight is simple, just needs work

As little fat as possible. Photo by Laurent Jean Philippe

you’ve been working out all through the year!). Magic diets and even more magical workout programs appear in magazines, blogs, etc.

I hate this trend. I’ll help you loos the weight you don’t want, but believe me, the biggest thing you’ll feel is a sense of accomplishment. Good fat burinning workouts are hard and tough. There’s no magic about them, only sweat. So, if this isn’t what you’re looking for, please click on the next Trainers hate this guy link you come across. Now, If you’re looking to burn fat for the summer, there are 2 key things you’ll have to get in order:

Diet

You can’t beat the dinner table. No matter how hard you try, it’ll always beat you back. So get your diet in order or you won’t be losing weight. Almost every piece of literature I’ve read on this give two main tips:

Have caloric deficit of 10-20% (You’ll need to calculate your basic caloric need for this). You’ll have to burn more than you eat in order to lose weight

Count calories weekly, not daily. It’ll make it easier.

Anyway, I’m not a nutrition expert so I’m not really qualified to help. But here are a couple of links I’ve found helpful.

The Right Way to Lose Fat: What You Eat (Breaking Muscle)

Exercise (insert evil laugh).

Here I will be helping you. How? I’ll workout for you… not! I’ll be offering 2 different approaches that will help lose weight without changing too much of your regular workouts. But please bear in mind. Fatloss is mostly achieved on a meal to meal basis.

The everyday blaster

This is one of the simplest protocols, and it complements your workouts and practices (they do not substitute). We’ll basically grab a compound exercise and practice it every day for a set number of reps. Make sure you make it challenging enough to work, but not as hard enough that you cannot do your regular workouts.

The 300 swings a day. This idea is from Pat Flynn from Chronicles of Strength, so full props to him. The idea is simple. Grab your kettlebell every day and swing it 300 times.

Now if you don’t have a kettlebell, don’t worry: burpees will put a blowtorch to your fat. Build up to 100 burpees a day and you’ll be golden.

http://www.youtube.com/watch?v=TX60BcsO_wE

Try jumping as high as you can

The finisher

Finishers are a great way to add burners to your strength practice. What’s the best finisher I’ve ever used? The sprint ladder. Sprint ladders are

how to lose weight? sprint

Run as fast as you can. Keep nothing in the tank

easy to understand, but do not underestimate them. You’ll need a small stretch of road/land/something

and mark 3 sets of distance (I usually do 30m, 60m and 100m, though the last one seldom looks like a sprint). Now, from the start line, you’ll sprint to your first mark, jog back to the start, sprint to the second mark, jog back to the start, sprint to the last line, and WALK back. Do this either for time or a set number of sets (5 works magic). Make sure you post your hate comments later. I like doing them on a hill.

A more civilized way of doing this (but not as effective nor adrenaline producing) is to do a short density set after your workout. Kb swings, kb snatches, burpees or high rep squats work wonders. You’ll set a timer to 10 minutes and do a set on the top of every minute. Once you can complete all 10 minutes with a given number of reps, add more reps. Try to keep 15 seconds of rest as a minimum (now’s when you add weight ;9)

Closing comments

Losing weight is a challenge best attacked head on. You don’t need to change your strength training to achieve it, in fact, I even discourage it. But it does take hard work and a focused will. This two suggestions will help you get there just remember that it’s mostly on a diet base that weight lose is really achieved. Enjoy and share your progress with us!

Note: following this suggestions may result in the following secondary effects: a higher level of conditioning and feeling of true awesomeness as bonus.

Motus Virtute

You need a challenge and you need it now!

Challenges are probably one of the most engaging, fun and satisfying things to do while training. It gives a sense of purpose and of gains that is impressively motivating. Given this, people will usually over extend a challenge and do it repeatedly as if it were nothing more than a workout (ie: the 300 routine – what you found online is a challenge, a big one), this is a mistake.

A challenge should last between a single workout or a cycle (4-6 weeks), done to test yourself, or with a very specific goal in mind. That’s what makes it a challenge and not your regular workout. Why shouldn’t you go over in time? You’d be overtaxing yourself, compromising your gains.Challenge quote

Creating your own challenges

  1. Keep your goals in mind
  2. Be as specific as possible
  3. Make it hard
  4. Keep it simple!

If you’re going to blast a PR or test yourself, make it consistent with what you’ve been doing so far. For example, it doesn’t make a lot of sense to test your distance running when you haven’t walked a single block in the last year. So, set yourself for success, and challenge yourself to become better in something that means something to you.

If you need some inspiration, here are some great challenges to take on!

Keep yourself challenged and motivated!

Do you have any challenges you’d like to share with us?

Motus Virtute

7 reasons why not to join a gym (or a box, or class or whatever)

I haven’t gone to a gym in quite a while. I’ll be honest, I’m pretty partial to doing my own thing in my own way and my own time. I enjoy the freedom, comfort and practicality of doing things at home or any other place of choice. I do understand it’s not for everyone, since not everyone has the determination and discipline to do it (but I’m betting you do).

1. No “open” hours

Training outside a gym lets you choose your own hours, your own time, your own everything.

No open hours means you do it when you want to do it. #workout freedom. Photo by Marino Gonzalez

No open hours means you do it when you want to do it. #workout freedom. Photo by Marino Gonzalez

2. No distractions (other than those YOU allow)

I train by myself in a park or at home. Guess what? I don’t have to put up with noisy kids, waste time clearing a barbell (because of someone’s lack of basic gym etiquette), pick up artists nor guys posing in front of mirrors as if they were the next Arnold.

3. Adaptive workouts

This is a particular advantage to classes. Basically, I can modify my practices to my energy levels, strengths and weaknesses. If I’m short on time, I get to choose which exercises will get full attention while others may be compromised. In a class context, this is incredibly hard, since teachers/coaches/you name it, have to take in account a group. Even though he may sometimes adapt things in general to a particular person, you don’t really get something completely tailored to your daily needs (this is, of course, not the case of personal training).

4. Limited resources

There was a time in which three was all we needed, probably a stronger time.

There was a time in which three was all we needed, probably a stronger time.

This may sound strange, but I think that having little to train with is an incredible advantage. You have to master one move before you can go to the next; you’ll have to dominate a certain weight before you’re strong enough for a big jump (as it used to be with kettlebells, and their half pood jumps). This will make you creative, this will make you patient, and this will help you stay healthy.

5. No witnesses

This cuts both ways, and one of them is definitely and advantage. You don’t get to compete with your buddies, so you can concentrate on doing things right instead of heavy or fast (or however you kids do your pissing contests). This is ultimately a good thing. Doing a bench press so heavy you can’t do it right, or doing half-assed push ups only to get a higher number is not only dumb, but also dangerous. You get to focus on doing right, believe me, strength, speed and endurance will follow.

Hell, you can do weird or sissy (no insult intended whatsoever) exercises without worrying about whispers and comments and such. Be weird, no one will judge 🙂

http://www.youtube.com/watch?v=dTuV4UqtxXk

There really is no need to impress, plus, you’ll get scolded

6. No waiting on equipment

This is self-explained. There’s nothing worse than having to wait for a group of people on a particular tool to finish while their rest periods take forever.

7. No etiquette needed

You get to do your thing in your underwear, and almost nothing beats that 😉 But seriously, if you’re going to the park to practice disregard this last item completely.

These are my reasons, and so far they’ve proven good. I’ve rebuilt my push-ups, pull-ups and squats completely, I’ve practiced at whatever hour I could (in busier times), I’ve had lighter days, quicker days and heavier, balls to the wall days without worrying of making a fool of myself. All of this, I’ve done in my undies.

Have you tried working out at home? Did it work for you? Share your experience with us!

Motus Virtute

No time to workout? Try one of these 4 short time workout strategies! (#3’s my personal favorite)

These 4 strategies will get you seriously strong and conditioned if you work at them seriously! But first, a little back story.

Not so long ago, before graduating, I had to juggle between a job and school. As you may imagine, I had less than little time

workout. Before needing a job, I was able to put hours on the gym (I wasn’t always so focused, so a lot of time-wasting happened), and that was ok, I didn’t really need to worry about optimizing my workouts time-wise.

But, then real responsibilities came along and, quite frankly, I didn’t really have (nor want) the time to go for well over an hour in

the gym. There was a lot to do, namely enjoying the benefits of said work. This has been so for over 5 years now, and I wouldn’t go back to marathonic workout sessions. What did I do? Here’s a couple of strategies to do the same (or more) in less time.

1. Get more bang for you buck: Prioritize

Kettlebell work for circuits

Kettlebell work is almost made for circuit training. Photo by Lorant Dankahazi

This is as simple as it gets and implies cutting off extra work, and it works great for the development of strength. There’s several ways to go about it

  • An exercise a day, plus some accessory work. Choose a big compound exercise such as the bench press, military press, squats or deadlifts and focus on it. Your accessory work should focus on something that builds towards it.
  • Focus only on two big compound exercises and work exclusively on them. This is my favorite of both approaches. Pavel’s Power to the People protocol works amazing for this, and in 20 minutes a day (or a total of 1:40 hours a week) tops you’ll be getting a lot stronger.

2. Try circuit training

Working circuits is simple. You just grab a bunch of exercises and perform them one after the other. Your rest between exercises and circuits should reflect your. The magic of this is that your rest periods will be shortened anyway, since you’ll be somewhat recovering from one exercise while performing the rest.

Usually, when I do circuits they go something like this:

  • A push
  • A pull
  • A knee bend (squat)
  • A hip hinge (kettlebell ballistics or bridge)
  • A core exercise

After every circuit I give myself two minutes of rest (or one, If I’m realllly feeling it) and start over. After 5 circuits I’m usually done for the day. Doing this 3-4 times a week will guarantee your success.

Reps and rest will depend on your conditioning level and your focus. If you’re going for a strength based practice you’ll do best with low reps and higher rests, invert it for conditioning. Or check out my post on defining your workout where I get better into it.

3. Density Training: Set a time and go!

This is by far my favorite of the 3 (Crossfitters may now it as AMRAP). Density in training is calculated as volume/time. Why is this a great type of training when you’re on a tight schedule? Because the progress in it is either in doing more in the same amount of time, or doing the same faster.

What has worked best for me Is to use a stop watch between 15-40 minutes and get my favorite circuit and go for it. Make sure to take note of your workout: how much did you do this practice? Great, now try to beat it by at least one rep or exercise completed on your next practice (always remember to practice safely though, the numbers will come).

Once you’ve added two rounds, change to harder exercises (usually best to change one at a time).

4. Extreme conditioning on the minute

Kettlebell Swing

Expect a healthy sweat! Photo by John Calnan

This is my favourite for finishers, but it’s a great conditioning tactic if you don’t have time. You’ll need a stopwatch or a timer. The idea is for you to do a set, rest for what’s left of the minute, and start over on the new minute. Kettlebell swings/snatches, burpees and bw squats work great here.

Wrap up

Any of these strategies will work wonders once you apply them, and will let you enjoy the rest of your life as well. They have been proven not only by me but by (at least) thousands who’ve used them successfully for their fitness goals. Just remember to fit them into your goals and you’ll be golden!

So, now that time’s no longer an excuse, what will you say when you won’t do it?

Also, If you’ve got any friends or family that complains for their lack of time, share this post with them, it may help them a lot!

Motus Virtute

The Rest is over: assess and focus

My whole last week was a deloading period. It was great, I feel great, but I was bored. So I ravage my training log and found two important things:

  • My schedule wasn’t balanced. Doing 3 practice days a week with 2 different days (alternating A-B-A-B) was leaving me with one less day. So, to solve it, I’ll be deloading at the fifth week (basically, I’ll be adding one extra week per cycle).
  • I had lost focus of the most basic of movements, and their numbers went down. So, I’ll be GTGing them back up to par (squats, pull-ups and hanging leg raises). This will be done besides my regular training, which includes all of these movements.

This is the real work in your deloading weeks: reassess your training, optimize and start over better, stronger, and better focus.

Restart with new focus. Photo by Fitness First Germany

Restart with new focus. Photo by Fitness First Germany

Motus Virtute,

Manuel

10 steps to the one arm push-up

The push-up has been a staple of strength and bodyweight control since the dawn of man, and not for lack of reason. The push-up will work most of your body, especially once you start going on to harder versions of this classic exercise.

This post is to show you how to go from zero to hero on your push-ups. I’ve built this one arm pushup tutorial from several places and my own experience on what has worked for me and others for the quickest, safest way to learn the One Arm Push-Up.

Play the progressions by ear. As a rule, on the first two steps once you can do 2 sets of 20 proper reps, you should be able to start on the next step. Try not to advance until you can do at least 3 perfect, solid reps on the level you wish to work.

Just remember, for these to work you’ll have to work at them! Be smart and challenge yourself.

Step 0: Wall push-ups + Elbow plank

I’m calling this step cero since I believe it should only be taken on by absolute sedentary, someone who hasn’t done any type of physical activity in a long time.

Elbow plank: Place your elbows straight under your shoulders and on the ground, your legs behind you. Hold your body in a straight line crushing your core and tensing your legs and buttocks. Remember your back should be flat, your tailbone in, your stomach tensed and your legs locked and firm.

Elbow plank

Wall Push-ups: To perform this exercise stand at arm’s length from a wall, feet together and your hands on the wall at shoulder width and height. From there bend your arms and go towards the wall, touching it with your forehead. Feet stay put during the whole movement and your hips and back should be straight. Reverse the movement from there.wall pushups

Step 1: Incline push-ups + Plank

Plank: Hold your body in the push-up position really crushing your core and tensing your legs and buttocks. Remember your back should be flat, your tailbone in, your stomach tensed and your legs locked and firm, as well as your elbows.

Full plank

Incline Push-up: place your hands on an elevated surface around hip height (shoulder width). Your body should be at 45º angle with the floor while your arms are straight. Feet together. From there bend your arm until your chest touches the surface, after that, press powerfully (and controlled) back into extended position.

incline pushup

Step 2: Kneeling push-ups

Kneeling push-ups: lie on the ground and place your hands under your shoulders, and bend your knees at 90 degrees. Keeping your knees together, press firmly with your hands until your arms are straight. That’s the beginning position. From there bend your arms until your chest touches the floor and press back up again.

knee pushup

Step 3: Push-ups

Place your hands beneath the shoulders on the ground (or any flat surface) and keep your body straight, your feet should be together (at most, hip distance). Keeping your plank bend your arm until your chest touches the floor. From there push the floor away with determination until your arms are straight again. Always keep your plank alignment.

Pushup

Step 4: Diamond push-ups and wide push-ups

Diamond push-ups: Place your hands beneath your chest as close as possible (think of your index and thumbs touching their opposites). From there, keeping your plank, bend your arms until your chest touches the back of your hand. From there press away from them in strength. Always keep your plank alignment. This movement has a stronger triceps involvement.

diamond pushup

Wide Push-ups: kind of the opposite, go wider than shoulder width (I like trying to keep my elbow at 90 degrees while in the lower position). From there once again, while keeping your plank, bend your arm until your chest touches the ground. Then push on the ground strongly. This move has a stronger pec involvement.

Wide pushup

Step 5: Decline Push-ups

Place your feet on a stable object (about knee height at least) and get into push-up position. Slowly bend your arm until your forehead touches the floor, and then reverse the movement. Keep your plank at all times.

decline pushups

Step 6: uneven push-ups

Get one hand on an unstable object (think basketball), the other on the ground and go into push-up position (note that one of your arms will be bent). Bend your arms until your elevated hand and shoulder touch (or as close as you can. DO NOT FORCE THE JOINTS). Reverse the movement. Don’t twist (keep your shoulders square) and always keep your plank (One will get straight; the other will be always bent).

uneven push ups

Step 7: Wall one arm push-up and one arm plank

Now things will start getting a lot more fun. Always remember to keep your plank and avoid twisting as much as you can. Your shoulders should remain square throughout all the movement.

One arm Plank: just as the plank but with only one arm holding you. It’s a balance challenge. Remember to keep your shoulders square and don’t twist.

OAPlank

Start arm distance against a wall. Place one hand on it, and keeping your plank bend the arm until your forehead touches the wall, then reverse the movement. Repeat on your other arm.

wall onearm pushup

Step 8: incline one arm push-up

The same as Step 1 but with just one arm. Remember to keep your plank and your shoulders square (don’t twist). Your legs should not be more than hip width apart.

1 arm incline pushup

Step 9: one arm knee push-up

Same as Step 2 but with one arm. Remember to keep tight.

one arm knee pushup

Step 10: one arm push-up

There you go, the OAPU and bragging right to go with it. Get into pushup position and lift one arm. Bend your arm until your chest touches the floor and then reverse the movement. Always keep your plank and your shoulders square. Twisting should be kept to a minimum, and strive to keep your feet no more than hip width apart!

one arm pushup

Coming soon: Progressing from the OAPU, what’s next?

So, where are you so far on your push-up training? Share with us and, if you have any experiential information to share with us please do!

If you know someone that’s been struggling with progressing on his push-ups share this article with him!

How and when to change your routine (and 3 rules to do it succesfully)

Many of us are variety addicts. We cannot keep to our self-plan for more than 3 straight sessions without thinking that some changes should be made. This is a huge mistake. Why? Because our bodies need time to adapt, they need enough stimulus and enough practice in order to learn new skills. We change because we get bored, because our goals are just too damn hard or because we’re not really committed to them.

What’s the cost to this? We don’t reach our goals, we get frustrated and we simply drop out. Well, if you’re like me, these small hacks may help you change things a bit, while keeping focused!

How and when to change your routine

Just a small change, as adding weight may spice your workout right up!

Just a small chante, as adding weight may spice your workout right up!

Photo by Drew Stephens @ flickr

Test yourself every cycle

By this I mean, either before or after your deloading period, test your max again. Test yourself on your next progression. Test yourself in whatever way you may like. This will help you adjust your practices, will keep you honest and will give you a great sense of achievement every time you nail it. Besides, nailing any type of PR feels badass.

Do the same but different

Sometimes, making some small tweaks to your regular practices will spark your training again. Maybe even help you crack some plateaus. Just change an exercise to one of its variants and try it for a couple of cycles (maybe one).

Play/have fun

Get CreativeIf your sole focus is always your goals you’re going to break. Athletes have their game days to keep them focused and having fun. Most of us, after high school, don’t really have this. So, you’ll have to play on your own way (just get your kids or friends to play with you, embrace the ridicule). Believe me, this can be anything that can get you to laugh while moving.

Besides, unless you’re a pro, who wants to get bored doing something that they don’t have to do.

Try something new

In addition to what you’re already doing. This may be a new exercise, a new activity, a new whatever related to your fitness. Just remember to keep your recovery in check!

Prioritize

This one’s probably not the best of all of my recommendations, but, the reality is that some days you’ll be more motivated and determined than others. Some days you’ll simply want to skip your practice. So, keeping your goals in mind: Which is more important? If you have only one goal ask yourself what portion of your practice is central, and which is accessory? Choose accordingly.

A Small Warning

Before you start changing everything up, it’s very important that you remember that consistency is key to all programs. So, even

The handstand a great exercise

The handstand makes a great addition to any regime. It also works great as substitute for military pressess.

though I’m suggesting you change some things remember these three basic rules:

1. Don’t make changes until you begin a new cycle: It may be tedious, but keep on doing what you’re doing. Believe me, you’ll regret it later.

2. Remember DO THE SAME BUT DIFFERENT: Don’t alter anything too much. Change a hip hinge for a hip hinge (say deadlifts for single leg deadlifts or deficit deadlifts), a press for a press, a pull for a pull, etc. Be specific here. Make the changes subtle.

3.Introduce new things one at a time: This will help you test them, and see the effects these have.

Just remember why you’re doing each and everything. Keep your mind on your goals and why you want to achieve them, it’ll make it a lot easier!

So, any of you guys have been using any of these hacks? Please, share with us!

Motus Virtute,

Manuel

3 reasons women should train heavy and the rockstar(-ish) body

Push-ups, a great excercise for all levels of fitness.

Push-ups, a great excercise for all levels of fitness. Photo by Christopher Haugh

So I’ve been talking with a friend of mine the other day and she told me she wanted to get back into fitness. Something about being afraid (I believe her, she’s special) that her boyfriend may leave her for a youger, perkier model. But, apart from telling her how stupid this thought was, when I told her what excercises and loads she had to do she freaked. So, even though this has been more than just talked about, I think it’s good to clarify the myths of strength training for women.

Strength equals tonus

So you want to be perkier, and harder, get your ass up and stop any kind of flapping in your arms? Well, you’ll have to tone up. The best way? You got it right, regular training with heavy weights. This builds residual tension, or, as we see it afterwards: a harder muscle even when it’s relaxed.

Strength equals a better figure

Just as consistent as gravity, a well-trained body, able to move and resist heavier loads will be better built. Yes, there will be a small hypertrophy (really small) but it will be in all the right places (more on this later). A stronger body will be better built, have a better posture, be more graceful and move better. And, even though it goes beyond the scope of this blog, a better posture and movement implies a better body language, and, according to studies, this correlates directly with self-esteem confidence and happiness.

Heavyweights will NOT bulk you up

This has been proven over and over again: Women’s lack of testosterone won’t allow you to naturally develop a bulky muscle mass. There will be hypertrophy of course, but it will all be on the right places and as long as your body continues to adapt. You’ll see better shaped legs, rounder shoulders, fuller buttocks and a better built arm than you’re used to; but these gains will be so small that only each woman will notice on her own body (if we men can’t notice a three finger haircut, trust me, we won’t really notice you’ve gotten bigger, only hotter). So, girls, take it easy, we won’t notice you hulking out ;).

So how should women train? Enter the Rockstar(ish) Program

Not long ago I read about certain numbers (probably arbitrary) that, if a woman could lift in the Deadlift, Squat and Pull-up she’d have a Rockstar body. I don’t know if the numbers are right, but I agree that these will improve aesthetically and healthily in general. So, we’ll focus on 4 movements.

Deadlift

Regular deadlift done 5×5. Once you get 5×5 in a given weight, add at least 2,5 kg (5lbs). Start with, at least 33,3% of your bodyweight. If your flexibility isn’t enough to do a full ROM DL, start on pins, and progress to the floor WITHOUT adding weight.

Goblet squats

Most women I know will do well starting with the GSquat, it almost always insures a good, safe and correct

Squats. A staple excercise for both form and function.

Squats. A staple excercise for both form and function.

movement. Here you should start rather light, once you get to a 5×5, add some weight. 2,5kg’s sound fine, but maybe go by 1,25kg increments as well (2,5lbs).

http://www.youtube.com/watch?v=M3ZxSMxK0EQ

One-arm military press (OMPs)

A unilateral exercise will allow you to still work your core while you’re doing your OMPs. Remember to really drive your legs to the floor and grip it with your feed, squeeze your glutes and create some intra-abdominal pressure to keep your spine safe. You should start light (around 5kg’s will go well for most women) and add 1,25kg once you get your 5×5. Start on your week hand.

Pull-up progressions

Most women (and men as well) I know couldn’t do a pull-up if their life depended on it. So you’ll start with an easier step. Just remember, pull-up progressions are a lot harder than they seem. Each progression has a big jump in difficulty (coming later as well). But for the video, here’s one to be impressed at.

Always remember to go adjusting any program as you move forward to see what works and what doesn’t. My friend will be starting on this next week, I’ll make sure to keep you guys posted!

Motus Virtute