Category Archives: Exercises

4 steps to pull-up mastery – how to do a pull up

The pull-up, few exercises have had more written about it, fewer still command the awe of its harder brethren or those who master the higher ends of its reps. An exercise so taxing, that even women, who go through the pain of birth giving, shudder to think about it, and many a physical-man works its way around it.

Getting real, there are probably very few exercises that command the respect of the pull-up. And with good reason: it’s one of the more complete exercises for the upper body. As Dan John said, he’s yet to see someone who can effectively do 20 pull-ups who cannot blast through any core challenge. I’ve even heard it named “the upper body squat”.

The only drawback with the pull-up is that, achieving only one may be deemed as an unfathomable challenge. But it is a beast you must master. So, here are 10 pull-ups variations that will teach you how to do a pull up. Bear in mind that all of these will take time.

How to do a pull up: Progressions

Step 1: Vertical pulls and hangs

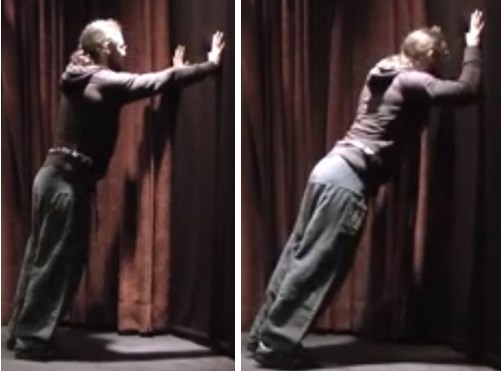
Vertical pulls: This is a beautiful exercise that will teach you how to pull with your back, if you do it correctly. To start grab onto a sturdy vertical structure (pole, doors, doorframe, ledge), your hands should be at shoulder level. Place your feed level (or as level as they can) with your hands. Shift your bodyweight slightly back, extending your arms until they are straight. From here pull yourself back to starting position. Remember to pull your shoulder blades together and pull with your back (not your arms!).

how to do a pull up step 1

This wiill start building your strength in your whole back and arms. Photo taken from videos of Francesco Vaccaro of Dragon flow yoga

Hang: just as the name implies, grab onto a pull-up bar and hang for time. Keep your shoulder blades together. Aim for a minute or so. Prepare for sore forearms

how to do a pull up step 1.2

Practice. You may feel a slight discomfort on your hands. That means your getting stronger.

Step 2: Australian pull-ups and pull-up holds

These exercises will keep you a longer time than you’ll wish. But they’re solid and great to build a base of strength in your pulling.

Pull-up Holds: find a bar and jump to the top of the pull-up position and hold it. Aim for a whole minute (it’s longer than you imagine).

how to do a pull up step 2.2

When you think you’re done, hold for a bit longer.

Australian pull-ups: find a bar or a sturdy surface about hip high. Lay yourself under it and grab it with your arms (they should be straight and shoulder width at least). Now, keeping your straight body pull yourself up until your chest touches the bar/edge of the surface. Hold it for a second and gently straighten your arms. Repeat.


Step 3: Assisted pull-ups and pull-up negatives

Pull-up negatives: this one should get you there on its own. Jump up to the top of the pull-up position and straighten your arms slowly (and by slowly I mean snail pace). Try to do it for 4-8 seconds.

how to do a pull up step 3.2

Feel that stretch!

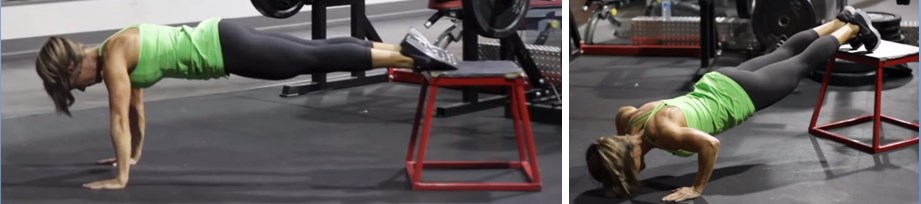
Assisted pull-ups (called jackknife pull-ups in Convict Conditioning): Grab onto the pull-up bar and find something to hold your feet at hip height. From that awkward position, pull yourself up until your chin clears the bar. This position will help you use some leg strength to aid you in the movement.

how to do a pull up step 3

Use your legs less and less as you get stronger. Eventually you won’t need them at all.

Step 4: The pull-up

Grab onto the bar with straight arms and pull yourself up until your chin clears the bar, pause, and straighten yourself back. Now practice, a lot.

how to do a pull up

Remember to keep practicing. Now hang and give me 10!

There, you’ve made it. Congratulations! Feel awesome; you’re now in the top half of the world. Now work on your pull-ups as often and fresh as possible and you’ll be pulling double digits in no time!

And that’s how to do a pull up from zero to hero. In a couple of weeks I’ll be posting on going beyond the pull-up to harder variations. Right now, if pull-ups feel too easy, add weight.

Motus Virtute

PS: If you liked this post and want to keep updated on all cool things we’ll be posting, sign up and recieve all updates in your e-mail!

10 steps to your first Pistol Squat

The bodyweight squat is almost magic in its benefits. It builds strength, endurance, power, bone density, balance, stability, it will strengthen your core, your flexibility, and not even mentioning what it will do to your ass and legs aesthetically. And the king of bodyweight squats: the pistol squat. Beautiful in its execution, this exercise will make you physically better all around.

Now, there’s many ways to build to the pistol. What I’m sharing right now is what’s helped me make the quickest and best progress. This is not, by any means, the only way (I just think it’s the best way).

Step 1: Jackknife Squats

This is taken directly from Convict Conditioning. Get a sturdy chair, or surface that’s up to knee height. Stand directly in front of it with your feet around hip width (play with this and find what’s more comfortable with you). Place your hands on the surface keeping your back straight. From there, bend your knees dropping between your legs. Once you can’t go down any further hold for a second, and then get back to the starting position. Repeat.

Under no circumstances should your heels leave the ground. This goes for every other step as well.

First step towards the pistol squat

Go slow. Keep your back straightish. Don’t let your heels leave the ground

Step 2: Supported Squats

For supported squats you’re going to hold onto a taller surface, while standing straight up. Keeping your feet around hip width and your back straight up, you’ll bend your knees and drop down as far as you can. On the bottom, pause for a second and then stand back up following the same movement. Repeat as needed.

Second step towards the pistol squat

Once again, grab a surface and get your ass to your calves

Step 3: Half Squats

Now you’ll be flying solo little bird. Stand up straight with your feet at least hip wide. Bending at the knee and hip go until your upper thigh gets parallel to the ground. Hold that position for a second and stand back up.

The third step to the pistol squat

Now you’ll be self supported. Imagine you’re sitting down before you pop back up.

Step 4: Full squats

Do the same as you did for half squats, but go all the way down, and pause a second on the bottom of the position. Repeat as necessary.

Half way to the pistol squat

Now you’ll go on your own all the way down. Congrats, you’re half way there!

Step 5: Narrow stance squats

Now we’ll be starting to challenge your balance.

Stand straight with your feet together. Now, slowly (so as to not lose your balance) bend at the hip and knees and go down until your ass rests on your calves. Hold there for a second and stand back up.

Fifth step to the pistol squat

Ladies, this will give you an ass to be remembered by

Steps 6, 7 & 8: Partial pistol squat

Now we’re starting to go unilateral. This step is best combined with any of those that have been done before so as not to lose your flexibility.

Find a chair or surface. I’ll let you decide what height is correct for you right now. Just remember to have it challenging, and, as you master a certain range of motion, add some. Stand with your back to the chair or surface. Lift one leg from the ground and slowly bend at the hip and knee of your grounded leg. Sit on the chair, hold it for a second, and reverse the movement.

Steps 7 and 8 are exactly the same, but on lower surfaces.

A small tip: shift your weight forward; it will help you keep your balance.

Either add reps or range of motion, never both on the same practice.

Partial pistol squat

Go slow now. It’s a lot different than going to legged.

Step 9: Supported pistol squat

(This works great along Step 8)

Grab onto a sturdy vertical surface (door frames kick ass for this). Lift one leg from the ground. Grabbing onto the door frame, bend at the knee and hip slowly on the grounded leg until your glutes kiss your calf. Hold it and reverse.

Almost at the pistol squat

Ease into it, full ROM does feel fine. Try to rely less and less on your hands, but on your balance.

Step 10: The Pistol Squat Proper.

Stand up straight and lift one leg from the ground. Now bend at your hip and knee while keeping your foot flat on the ground (you did remember to never lift your heel), until you can rest on your calf and reverse. Expect to fall some until you find your balance sweet spot, if this is still too hard, grab a small weight (2kg at most), it will help you with your balance.

The pistol squat

Now, this is might not be beautifully executed. But you get the idea.

Practice your pistol squat until you become as adept as a flamingo. Seriously, this exercise will help you with any of your fitness goals, knee health, flexibility, balance and strength. Expect future variations to come.

I hope this progression helps you. If there’s anything that you may need please let us know

Motus Virtute

10 steps to the one arm push-up

The push-up has been a staple of strength and bodyweight control since the dawn of man, and not for lack of reason. The push-up will work most of your body, especially once you start going on to harder versions of this classic exercise.

This post is to show you how to go from zero to hero on your push-ups. I’ve built this one arm pushup tutorial from several places and my own experience on what has worked for me and others for the quickest, safest way to learn the One Arm Push-Up.

Play the progressions by ear. As a rule, on the first two steps once you can do 2 sets of 20 proper reps, you should be able to start on the next step. Try not to advance until you can do at least 3 perfect, solid reps on the level you wish to work.

Just remember, for these to work you’ll have to work at them! Be smart and challenge yourself.

Step 0: Wall push-ups + Elbow plank

I’m calling this step cero since I believe it should only be taken on by absolute sedentary, someone who hasn’t done any type of physical activity in a long time.

Elbow plank: Place your elbows straight under your shoulders and on the ground, your legs behind you. Hold your body in a straight line crushing your core and tensing your legs and buttocks. Remember your back should be flat, your tailbone in, your stomach tensed and your legs locked and firm.

Elbow plank

Wall Push-ups: To perform this exercise stand at arm’s length from a wall, feet together and your hands on the wall at shoulder width and height. From there bend your arms and go towards the wall, touching it with your forehead. Feet stay put during the whole movement and your hips and back should be straight. Reverse the movement from there.wall pushups

Step 1: Incline push-ups + Plank

Plank: Hold your body in the push-up position really crushing your core and tensing your legs and buttocks. Remember your back should be flat, your tailbone in, your stomach tensed and your legs locked and firm, as well as your elbows.

Full plank

Incline Push-up: place your hands on an elevated surface around hip height (shoulder width). Your body should be at 45º angle with the floor while your arms are straight. Feet together. From there bend your arm until your chest touches the surface, after that, press powerfully (and controlled) back into extended position.

incline pushup

Step 2: Kneeling push-ups

Kneeling push-ups: lie on the ground and place your hands under your shoulders, and bend your knees at 90 degrees. Keeping your knees together, press firmly with your hands until your arms are straight. That’s the beginning position. From there bend your arms until your chest touches the floor and press back up again.

knee pushup

Step 3: Push-ups

Place your hands beneath the shoulders on the ground (or any flat surface) and keep your body straight, your feet should be together (at most, hip distance). Keeping your plank bend your arm until your chest touches the floor. From there push the floor away with determination until your arms are straight again. Always keep your plank alignment.

Pushup

Step 4: Diamond push-ups and wide push-ups

Diamond push-ups: Place your hands beneath your chest as close as possible (think of your index and thumbs touching their opposites). From there, keeping your plank, bend your arms until your chest touches the back of your hand. From there press away from them in strength. Always keep your plank alignment. This movement has a stronger triceps involvement.

diamond pushup

Wide Push-ups: kind of the opposite, go wider than shoulder width (I like trying to keep my elbow at 90 degrees while in the lower position). From there once again, while keeping your plank, bend your arm until your chest touches the ground. Then push on the ground strongly. This move has a stronger pec involvement.

Wide pushup

Step 5: Decline Push-ups

Place your feet on a stable object (about knee height at least) and get into push-up position. Slowly bend your arm until your forehead touches the floor, and then reverse the movement. Keep your plank at all times.

decline pushups

Step 6: uneven push-ups

Get one hand on an unstable object (think basketball), the other on the ground and go into push-up position (note that one of your arms will be bent). Bend your arms until your elevated hand and shoulder touch (or as close as you can. DO NOT FORCE THE JOINTS). Reverse the movement. Don’t twist (keep your shoulders square) and always keep your plank (One will get straight; the other will be always bent).

uneven push ups

Step 7: Wall one arm push-up and one arm plank

Now things will start getting a lot more fun. Always remember to keep your plank and avoid twisting as much as you can. Your shoulders should remain square throughout all the movement.

One arm Plank: just as the plank but with only one arm holding you. It’s a balance challenge. Remember to keep your shoulders square and don’t twist.

OAPlank

Start arm distance against a wall. Place one hand on it, and keeping your plank bend the arm until your forehead touches the wall, then reverse the movement. Repeat on your other arm.

wall onearm pushup

Step 8: incline one arm push-up

The same as Step 1 but with just one arm. Remember to keep your plank and your shoulders square (don’t twist). Your legs should not be more than hip width apart.

1 arm incline pushup

Step 9: one arm knee push-up

Same as Step 2 but with one arm. Remember to keep tight.

one arm knee pushup

Step 10: one arm push-up

There you go, the OAPU and bragging right to go with it. Get into pushup position and lift one arm. Bend your arm until your chest touches the floor and then reverse the movement. Always keep your plank and your shoulders square. Twisting should be kept to a minimum, and strive to keep your feet no more than hip width apart!

one arm pushup

Coming soon: Progressing from the OAPU, what’s next?

So, where are you so far on your push-up training? Share with us and, if you have any experiential information to share with us please do!

If you know someone that’s been struggling with progressing on his push-ups share this article with him!