Tag Archives: Strength training

A push + A pull + a leg: a Simple Strength training routine

We’ve all seen a million programs. Right now, if you open a fitness magazine you’ll see the lastest GET YOUR ABS RIPPED IN 10 MINUTES

not the results of a strength training routine

Not gonna happen without some genetical, chemical and even magical help

PROGRAM program in which you’ll be even belly dancing in order to get your abs to show. Of course, most of these programs are overkill. That’s one of the many reasons they won’t help you succeed. Now, the list of problems with those types of strength training routine is long, hauntingly so, and it’s a topic for another post. Today I’m going to share with you my go to routine for time compressed moments. This, of course, is not the best program ever, but it will get you results with minimal, but very constant, efforts. This is a generalist’s program. It won’t give you buldging biceps, monstrous calves and laundromat abs, but it will make you stronger and fitter (it is after all a strength training routine).

So, to the program!

I’m going to give you options for kettlebells, bodyweight and barbells. I will not, though, give you machine variants, nor sandbags (since I’m absolutely not an expert).

A push

Barbell/Dumbbell: Benchpress, pushpress, military press, side press.

Kettlebells: Military Press (give it a clean as well), push press, sots press, sidepress.

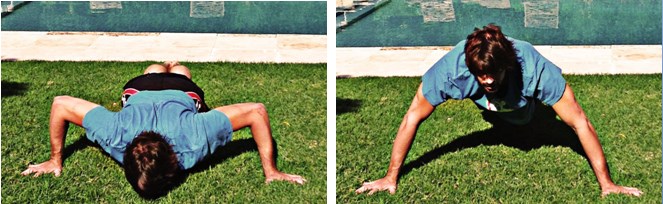
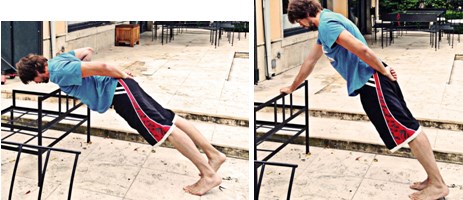
Bodyweight: push-ups (variants), handstand push-ups, dips.

A pull

Barbell/dumbbell: Row, deadlifts. Weighted pull-ups

Kettlebell: Row, snatch, swings

Bodyweight: Pull-ups (if you can’t manage one yet click here, more advanced variations to come), Bodyweight rows.

A leg

Barbell/dumbbell: Font/Back/Goblet squat, deadlifts

Kettlebell: front/goblet/over the head squat, swings, snatch, Clean & Jerk

Bodyweight: squats, pistols, jumpsquats.(Variants and how to get to your first pistol here)

How to make it work

This is a minimalist program. Pick one exercise from each. You’ll be doing this 5 days a week (yes, 5). You’ll be doing 2-3 sets of each every day.

Deadlifts are key to every strength training routine

Completely complete, there’s a reason dead’s are a staple in every strength training routine. Photo by Tom Woodward

You’ll keep your reps low (swings, snatches and bodyweight squats may be done in higher reps, but I don’t recommend it), and you will never ever go to failure. Keep your rests longish.

How to progress:

Barbells: this one’s easier. You’ll be adding 2.5kg (5 pounds) to each exercise every 3 workouts.

Kettlebells: you’ll be adding 1 rep a week, but never on Mondays.

Bodyweight: you’ll be adding 1 rep a week, but never on Mondays either.

On kettlebells and bodyweight excercises once you get to 10 reps (which is what I call highish reps) you’ll change to a tougher variant. The reason I ask you not to add to the challenge on Mondays is because you’ll be better rested, but not necessarily stronger. Every one of these workouts should build to the next.

As you can see, it’s a pretty straight forward strength training routine. You pick a few exercises, and go, slowly progressing as you get stronger. You can’t go wrong!

Motus Virtute

No time to workout? Try one of these 4 short time workout strategies! (#3’s my personal favorite)

These 4 strategies will get you seriously strong and conditioned if you work at them seriously! But first, a little back story.

Not so long ago, before graduating, I had to juggle between a job and school. As you may imagine, I had less than little time

workout. Before needing a job, I was able to put hours on the gym (I wasn’t always so focused, so a lot of time-wasting happened), and that was ok, I didn’t really need to worry about optimizing my workouts time-wise.

But, then real responsibilities came along and, quite frankly, I didn’t really have (nor want) the time to go for well over an hour in

the gym. There was a lot to do, namely enjoying the benefits of said work. This has been so for over 5 years now, and I wouldn’t go back to marathonic workout sessions. What did I do? Here’s a couple of strategies to do the same (or more) in less time.

1. Get more bang for you buck: Prioritize

Kettlebell work for circuits

Kettlebell work is almost made for circuit training. Photo by Lorant Dankahazi

This is as simple as it gets and implies cutting off extra work, and it works great for the development of strength. There’s several ways to go about it

  • An exercise a day, plus some accessory work. Choose a big compound exercise such as the bench press, military press, squats or deadlifts and focus on it. Your accessory work should focus on something that builds towards it.
  • Focus only on two big compound exercises and work exclusively on them. This is my favorite of both approaches. Pavel’s Power to the People protocol works amazing for this, and in 20 minutes a day (or a total of 1:40 hours a week) tops you’ll be getting a lot stronger.

2. Try circuit training

Working circuits is simple. You just grab a bunch of exercises and perform them one after the other. Your rest between exercises and circuits should reflect your. The magic of this is that your rest periods will be shortened anyway, since you’ll be somewhat recovering from one exercise while performing the rest.

Usually, when I do circuits they go something like this:

  • A push
  • A pull
  • A knee bend (squat)
  • A hip hinge (kettlebell ballistics or bridge)
  • A core exercise

After every circuit I give myself two minutes of rest (or one, If I’m realllly feeling it) and start over. After 5 circuits I’m usually done for the day. Doing this 3-4 times a week will guarantee your success.

Reps and rest will depend on your conditioning level and your focus. If you’re going for a strength based practice you’ll do best with low reps and higher rests, invert it for conditioning. Or check out my post on defining your workout where I get better into it.

3. Density Training: Set a time and go!

This is by far my favorite of the 3 (Crossfitters may now it as AMRAP). Density in training is calculated as volume/time. Why is this a great type of training when you’re on a tight schedule? Because the progress in it is either in doing more in the same amount of time, or doing the same faster.

What has worked best for me Is to use a stop watch between 15-40 minutes and get my favorite circuit and go for it. Make sure to take note of your workout: how much did you do this practice? Great, now try to beat it by at least one rep or exercise completed on your next practice (always remember to practice safely though, the numbers will come).

Once you’ve added two rounds, change to harder exercises (usually best to change one at a time).

4. Extreme conditioning on the minute

Kettlebell Swing

Expect a healthy sweat! Photo by John Calnan

This is my favourite for finishers, but it’s a great conditioning tactic if you don’t have time. You’ll need a stopwatch or a timer. The idea is for you to do a set, rest for what’s left of the minute, and start over on the new minute. Kettlebell swings/snatches, burpees and bw squats work great here.

Wrap up

Any of these strategies will work wonders once you apply them, and will let you enjoy the rest of your life as well. They have been proven not only by me but by (at least) thousands who’ve used them successfully for their fitness goals. Just remember to fit them into your goals and you’ll be golden!

So, now that time’s no longer an excuse, what will you say when you won’t do it?

Also, If you’ve got any friends or family that complains for their lack of time, share this post with them, it may help them a lot!

Motus Virtute

The Rest is over: assess and focus

My whole last week was a deloading period. It was great, I feel great, but I was bored. So I ravage my training log and found two important things:

  • My schedule wasn’t balanced. Doing 3 practice days a week with 2 different days (alternating A-B-A-B) was leaving me with one less day. So, to solve it, I’ll be deloading at the fifth week (basically, I’ll be adding one extra week per cycle).
  • I had lost focus of the most basic of movements, and their numbers went down. So, I’ll be GTGing them back up to par (squats, pull-ups and hanging leg raises). This will be done besides my regular training, which includes all of these movements.

This is the real work in your deloading weeks: reassess your training, optimize and start over better, stronger, and better focus.

Restart with new focus. Photo by Fitness First Germany

Restart with new focus. Photo by Fitness First Germany

Motus Virtute,

Manuel

10 steps to the one arm push-up

The push-up has been a staple of strength and bodyweight control since the dawn of man, and not for lack of reason. The push-up will work most of your body, especially once you start going on to harder versions of this classic exercise.

This post is to show you how to go from zero to hero on your push-ups. I’ve built this one arm pushup tutorial from several places and my own experience on what has worked for me and others for the quickest, safest way to learn the One Arm Push-Up.

Play the progressions by ear. As a rule, on the first two steps once you can do 2 sets of 20 proper reps, you should be able to start on the next step. Try not to advance until you can do at least 3 perfect, solid reps on the level you wish to work.

Just remember, for these to work you’ll have to work at them! Be smart and challenge yourself.

Step 0: Wall push-ups + Elbow plank

I’m calling this step cero since I believe it should only be taken on by absolute sedentary, someone who hasn’t done any type of physical activity in a long time.

Elbow plank: Place your elbows straight under your shoulders and on the ground, your legs behind you. Hold your body in a straight line crushing your core and tensing your legs and buttocks. Remember your back should be flat, your tailbone in, your stomach tensed and your legs locked and firm.

Elbow plank

Wall Push-ups: To perform this exercise stand at arm’s length from a wall, feet together and your hands on the wall at shoulder width and height. From there bend your arms and go towards the wall, touching it with your forehead. Feet stay put during the whole movement and your hips and back should be straight. Reverse the movement from there.wall pushups

Step 1: Incline push-ups + Plank

Plank: Hold your body in the push-up position really crushing your core and tensing your legs and buttocks. Remember your back should be flat, your tailbone in, your stomach tensed and your legs locked and firm, as well as your elbows.

Full plank

Incline Push-up: place your hands on an elevated surface around hip height (shoulder width). Your body should be at 45º angle with the floor while your arms are straight. Feet together. From there bend your arm until your chest touches the surface, after that, press powerfully (and controlled) back into extended position.

incline pushup

Step 2: Kneeling push-ups

Kneeling push-ups: lie on the ground and place your hands under your shoulders, and bend your knees at 90 degrees. Keeping your knees together, press firmly with your hands until your arms are straight. That’s the beginning position. From there bend your arms until your chest touches the floor and press back up again.

knee pushup

Step 3: Push-ups

Place your hands beneath the shoulders on the ground (or any flat surface) and keep your body straight, your feet should be together (at most, hip distance). Keeping your plank bend your arm until your chest touches the floor. From there push the floor away with determination until your arms are straight again. Always keep your plank alignment.

Pushup

Step 4: Diamond push-ups and wide push-ups

Diamond push-ups: Place your hands beneath your chest as close as possible (think of your index and thumbs touching their opposites). From there, keeping your plank, bend your arms until your chest touches the back of your hand. From there press away from them in strength. Always keep your plank alignment. This movement has a stronger triceps involvement.

diamond pushup

Wide Push-ups: kind of the opposite, go wider than shoulder width (I like trying to keep my elbow at 90 degrees while in the lower position). From there once again, while keeping your plank, bend your arm until your chest touches the ground. Then push on the ground strongly. This move has a stronger pec involvement.

Wide pushup

Step 5: Decline Push-ups

Place your feet on a stable object (about knee height at least) and get into push-up position. Slowly bend your arm until your forehead touches the floor, and then reverse the movement. Keep your plank at all times.

decline pushups

Step 6: uneven push-ups

Get one hand on an unstable object (think basketball), the other on the ground and go into push-up position (note that one of your arms will be bent). Bend your arms until your elevated hand and shoulder touch (or as close as you can. DO NOT FORCE THE JOINTS). Reverse the movement. Don’t twist (keep your shoulders square) and always keep your plank (One will get straight; the other will be always bent).

uneven push ups

Step 7: Wall one arm push-up and one arm plank

Now things will start getting a lot more fun. Always remember to keep your plank and avoid twisting as much as you can. Your shoulders should remain square throughout all the movement.

One arm Plank: just as the plank but with only one arm holding you. It’s a balance challenge. Remember to keep your shoulders square and don’t twist.

OAPlank

Start arm distance against a wall. Place one hand on it, and keeping your plank bend the arm until your forehead touches the wall, then reverse the movement. Repeat on your other arm.

wall onearm pushup

Step 8: incline one arm push-up

The same as Step 1 but with just one arm. Remember to keep your plank and your shoulders square (don’t twist). Your legs should not be more than hip width apart.

1 arm incline pushup

Step 9: one arm knee push-up

Same as Step 2 but with one arm. Remember to keep tight.

one arm knee pushup

Step 10: one arm push-up

There you go, the OAPU and bragging right to go with it. Get into pushup position and lift one arm. Bend your arm until your chest touches the floor and then reverse the movement. Always keep your plank and your shoulders square. Twisting should be kept to a minimum, and strive to keep your feet no more than hip width apart!

one arm pushup

Coming soon: Progressing from the OAPU, what’s next?

So, where are you so far on your push-up training? Share with us and, if you have any experiential information to share with us please do!

If you know someone that’s been struggling with progressing on his push-ups share this article with him!

Active Rest: the importance of deloading

The importance of deloading

Recently I’ve been feeling overly fatigued. I was feeling stiff, hard and tired. So, of course, I went over my training log. Lo and behold, the answer was staring right at me: I haven’t taken a proper deloading week for the last 4 months. Big mistake. BIG MISTAKE.

Deloading is not an excuse to not practice

Deloading is not an excuse to not practice. Photo by Fabio de Albuquerque Vialba

Deloading is crucial for any program (a key aspect in programming as I mentioned in my last post SECOND STEP). On this week you’ll rest, recover and lock-in your progress. While reading one of Pavel’s books (the original RKC – The Russian Kettlebell Challenge) he stated that one of the most effective ways to build strength is to practice moderation when considerably fatigued.

Basically your Deloading template shouldn’t be too hard to manage. I’m partial to the 50% in volume school. Others have thrived through 50% in intensity; some even with 50% of both. Whichever makes the most sense to you; all schools have something in common: It’s not the same as not doing it. This week should not be seen as a “no work out week”. That’s not the point and it will be detrimental to your gains.

The importance of Deloading is intimately tied with the importance of rest. But that is material for another post.

Hope you’ve found this article helpful in your quest for fitness and health!

Motus Virtute

Manuel

5 exercises to a strength routine

There’s a lot of literature on this topic. This here is my view, according to what’s worked best for me and many I’ve helped.

Building a basic strength program is not a particularly hard thing, as long as you have your goals in mind and a clear way to progress. Given the amount of information on the internet about this, it seems redundant to add to the information. But I believe a little summary on it might go a long way.

Excercise selection

This will be your basic excercises, make sure to choose at least one in each category.

  1. A press: bench presses, military presses, push-ups, dips, …

    Pullups - The upper body solution for strength training. Photo by 316ESC

    Pullups – The upper body solution for strength training. Photo by 316ESC

  2. A pull: pull-ups, rows, levers, …
  3. A knee bend: squats, pistols, squats, pistols (yep, that’s what you’ll choose from)
  4. A hip hinge: Deadlifts, hypers, bridges
  5. Core: hanging leg raises, side levers, ab rollouts, etc.

And, according to your tools, we’ll divide how to build it according to your preferences.

The weight room: Barbells & Dumbells

For me personally, it usually works best if I do them at least 3 times a week, you may want to try and split them. If you do, I’d best recomend joining your knee-bends and your pulls, and you presses and hip-hinges, since they don’t overlap too much. Your core work it either day.

If you do split, I’d recomend adding at least one more excercise that builds towards your main lifts, more towards the end (don’t do curls before you pull-up), or doing both plains of movement (vertical and horizontal) on the same day.

The rest, build it with a 3-5 template: 3-5 sets of 3-5 reps with 3-5 minutes of rest between excercises 3-5 days a week. Once you hit 5×5 in a given weight, add some more and start over. And DO NOT go to failure. Leave 2 reps in the bank. Finish strong and energized. This is the easiest to know how to progress.

Kettlebells

Kettlebells have the obstacle of being a fixed weight. So, we’ll have to define when we’ve mastered a given weight, or when we’re ready to move up. In my case once 5×5 becomes easy I go to a more difficult variation. Bear in mind that hip-hinges with a kettlebell end up feeling a bit on the light side (especially when you have only the one, single leg deadlifts with 32 kg (70 lbs) just aren’t that heavy), so feel free to go balls out with ballistic excercises.

A 3-5 method here works as a beauty as well. On ballistics (do them towards the end of your session) go balls out, you’ll be stronger after it anyway (described in dragon door as the WTH effect). Search also for harder variations (ie: military press can be done sitting on the floor, or a sots press, or slower tempo; rows can become renegade rows; etc.)

Bodyweight Training

Building strength with bodyweight training is a bitch. A complete, utter and total bitch. Being able to do 5×5 on push-ups will not help you build enough strength for other harder excercises, unless you’re patient enough to go in small increments in your leverage. And even that may not be enough. BW training usually calls for higher reps in order to build, not only strength, but tendon, ligament and joint health as well.

A 3-5 template doesn’t work that well either. 3-5 days a week, 3-5 sets with 3-5 minutes of rest works well, but you may want to start low on your reps, and keep building them up.

Be sensitive, doing 5×5 push-ups once you’re strong enough won’t make a lot of progress, but doing 5×50 for strength won’t either. When you feel you might get at least 3 good, crisp reps, without going to failure on the next rung of the ladder, it’s time to progress.

Mind you, I may be bitching about it, but the feeling of accomplishement of training with this method’s been, for me, much larger than the others.

As a side note: Remember to deload every 4th to 6th week and keep your journal updated!

Well this post ran a bit longer than I anticipated, but I hope it clarifies some of the main questions when you’re trying to build your own routine. Remember, this is a basic template and it will allow you to progress if you work at it. It doesn’t mean that other things won’t or that they won’t work better for your particular case. But, both for me and for most of the people I’ve helped, this was right up their alley.

Motus Virtute

Manuel

Have you tried a similar template? how did that work for you?

4 ways to kill your routine

There are several ways to completely destroy your routines, be they good or bad. Here are 4 sure fire ways to kill your training routine’s potential:

  • Not following through.
  • Not using the right progression
  • Not keeping a log
  • Not making adjustments along the way

Not Following Through

This one needs no elaboration. It’s quite simple: if you’re not doing it, it won’t work for you (duh!). You want to make it work? Work at it!

Not using the right progression

This one has 3 possible causes: you don’t know what comes next, you’re going too easy (lazy) or you’re going too hard (ego). Using the right progression will keep you advancing while honeing you’re technique. It will make you stronger and results will flourish. Now, if yours is the first scenario let me be the first to welcome you to the internet, you’ll find a shitload of information, variations and progressions for whatever excercise you’re doing (this is particularly tough for bodyweight excercises and other fixed weights), do your research, ask questions, whatever you need (if I can help you, leave me a message and I’ll answer you as soon as I can).

The second reason, that you’re going too easy, means that you’re basically going through the motions: when was the last time you added weights? reps? shortened your rest periods? made an excercise slightly harder? If you keep doing what you always did, don’t expect to move forward, but backwards instead.

If the problem is that you’re going too hard, please, either leave your ego at the door or be smarter while doing it. Singles and partials have their place, but doing 3 sets of 1 or half a rep a week won’t get you anywhere. Best start at least with an excercise you can manage 5 reps in good form and do 3, keep adding reps till you get where you want. Everyone has a pace, and it’s there for a reason.

Not keeping a log

For years I read this one and thought it was not really needed, I could keep track. Reality said different. A training log is a pool of information made by you, for you, about you. It doesn’t get better than this. A good log will let you see:

  1. Where you’re at.
  2. How you’re progressing
  3. What you’re failing to do
  4. What’s working and what’s not

If say, your log shows that you’re stuck for months in the same excercise/weight/volume it’s probably time to change the variables. But you won’t know it until you’re able to check it!

Not making adjustments along the way

This one’s related to those that came before. A good plan needs to be adjusted: you’re life, you’re progress won’t always keep the same, you’re strength levels, etc. won’t either. You need to be able to make adjustments according to your context. Maybe you’ve gotten stronger and need to adjust the weight, or change the excercise. Maybe you’ve got no time in you’re hands and need to prioritize certain excercises.

Remember, you’re doing this to improve your life, not to be ruled by it.

Remember, there’s a pace for everyone and it will be dictaded by your own body. Just be clear on your goals, where you’re at, and act accordingly. Don’t be afraid to go heavier, and there’s really no shame in going back a couple of steps.

The Easiest Fix

The easiest way to fix this is: KEEP A TRAINING LOG. And make it detailed. It can have as many or few items as you want it to, just make sure it tracks what you’re doing in your practices and how you’re progressing. Use photos, weigh yourself, take down volume, intensity, etc. Just make sure YOU understand it and that you can follow it. Besides, it’s easy to do it, bare minimum, write after each workout to make .

Motus Virtute,

Second step: building your workouts

This post is directly linked to the one about Goal-setting.
This time we should focus on planning and programming. Simply put, once we know where we’re going we should chart the best way to get there.

What makes a program?

  • Excercises: what we’ll do
  • Intensity: how hard we’ll do it.
  • Volume: how much we’ll do.
  • Frecuency: how often we’ll do it.
  • Progression: how we’ll advance.
  • Rest: how you’ll recover

These items will, of course, depend on our goals. Back in the other post I mentioned that one of my goals was to do 3 one-arm pull-ups by September, so here is how the programming will look like:

  • Excercises: any that builds towards the OAPU. Mostly Pull-up variations.
  • Intensity: this is a strength feat, so my focus should be on high intensity training (basically, the hardest pull-up variations I can manage for at least 5 reps).
  • Volume: Mid to low. It’s best to practice strength excercises while being as fresh as possible.
  • Frequency: The higher the volume, the lower frequency should be. Being that the OAPU is going to be a tough challenge, a higher frequency is recommended. So let’s say high.
  • Progressions:  Here we should determine two things:
    • Which excercises to tackle: assisted pull-ups, pull-ups, grip variety pull-ups, archer pull-ups,…
    • When to tackle them (as in, when do you believe you’re ready for the next step) (once you manage 3 sets of 10 reps, advance, etc.)
  • Rest: You should determine your de-loading weeks, how often you’ll workout and how you’ll rest.

So, once you’ve defined your goals you should be able to write up your plan. I’ll make a list of some generalities to take in account:

Goal orientation

Strength focus

Intensity: High, between 80% and 90%

Volume: low (think 3-5 sets of 3-5 reps).

Frequency: highish. You should do this between 3-5 days a week. And, since volume will be low, feel free to repeat your workouts during the week.

Rest: High rest periods between sets are preferable. And deloading at the end of each cycle will be key.

Stamina/endurance focus

Intensity: mid to low (think 50%-60%)

Volume: high to ridiculous (just do as much as you can)

Frequency: here it’s a tough one: you want to leave enough to recover but want to train to go on while tired. Go with a mid frequency, but allow time to recover yourself.

Rest: as little as possible between sets, many swear by heart rate measurments (ie: once you’re back to 135 bpm). Also, you should deload after every cycle.

Muscle building focus

Intensity: mid to high (think 70%-80%)

Volume: high. You want to create fatigue. I’d recommend going to muscle failure often (probably in your last sets of each exercise)

Frequency: Depending on how you’ll split your routine. But I’d go no more than 3 times a week for the same movement patterns.

Rest: a mid term rest (between 1 and 3 minutes) between sets is usually a good place to start. Try to let your muscles recover between their workouts (if you’re working on split routines)

Please bear in mind that muscle building, as well as fat burining are tied to a diet and nutrition plan. Much more so than your routine.

General health

Intensity: Varied. Go through the whole spectrum at least one a week.

Volume: Varied as well. You’ll want to do more on your lower intensity days, less in your higher intensity days.

Frequency: I’d recommend daily, but allowing plenty time to rest. A good way to manage the fatigue would be to create a small cycle in your week, having light, medium and tough/hard days.

Rest: This will depend on that day’s/cycle’s focus. But please bear in mind that you should feel “fresh” on the next day. A deloading week after each cycle is highly recomended.

Just remember, this is not enough. Once you know what to do you should start doing it. The only programs that give results are those that ar followed.

There’s not much more to this (if you’re a pro, your needs will probably be very different). The rest is up to you. And remember, the plan is the path, but you’ll have to walk it to get to your goals.

What are your fitness plans? Feel free to share with us!

Motus Virtute

Setting yourself for success: Goal setting

FIRST STEP: FIND NORTH

Your whole training should be defined by what you want to achieve. Once you know that, the other variables will set into place.

We’re just beggining the new year and most of us start of with our New Year’s Resolutions. Our list of thing’s we’ll want to achieve by the end of the year, etc. Most of these lists have fitness in common. Most of the fitness blogs and sites out there have been dedicating posts to this topic since mid December and not in vain. Goal setting will define your whole training.

Without a destination, how will we know when we’ve arrived? How will we even know what path to take? (this goes beyond training and physical development. But, since it’s not the object of this blog, I won’t go into it. If there’s more you’d like to know just drop me a note, I’ll be more than happy to direct you to better authorities than myself). Coming back to subject: only if we know where we’re going towards will we know what path to take (and then we’ll have to walk it).

Only if we know where we’re going towards will we know what path to take (and then we’ll have to walk it)

So how do we define a good goal?

  • It’s precise
  • It’s measurable
  • It has a time limit
  • It’s realistic, but ambitious.

As an example, one of my goals for this year is to be able to do 3 one-arm pull-ups by september 2014. Another one (much more ambitious) running the 2015 Columbia race (it’s a trail race, 120km in 3 days).

Defining wether or not it’s realistic is a huge challenge. For that, we’ll have to be honest and know where we stand, let’s call it Point A (yeah, I know, I’m a creative genius). In my pull-up case, Point A is being able to do 15 technically correct, no kip pullups. Will I be able to do one-arm pull ups by september? Sure, it will be challenging and it will be hard. It is ambitious.

Now, knowing where we want to go will allow us to program our training in a sensible and targeted way. But that’s next post’s problem.

Motus Virtute